Purpose
Specify additional hip framing information during input to achieve desired results. This feature is ideal for structures with complicated hip systems and other non-standard framing conditions.
Steps
 Watch video - Advanced hip sets
 Watch video - Repetitive truss input
To use Advanced Hip functionality:
1. Define left, front, and right side of hip, always working counter-clockwise.
2. From the Truss Placement menu, select Hip Set or click  .
.
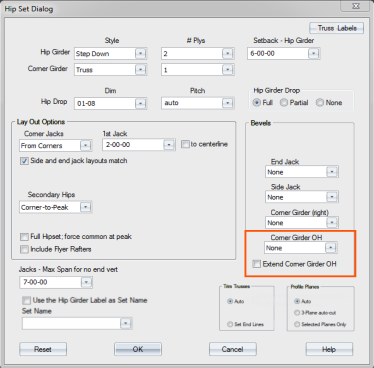
3. Define hip set options and select the appropriate Trim and Profile Plane options.
For Trim Trusses and Profile Planes:
-
When both options are set to Auto, Truss Studio automatically determines the boundaries of the truss and auto-finds planes.
-
When Auto and 3-Plane auto-cut are selected, Truss Studio automatically defines the profile planes. See Create Hipsets Using Trim and Profile Plane Options.
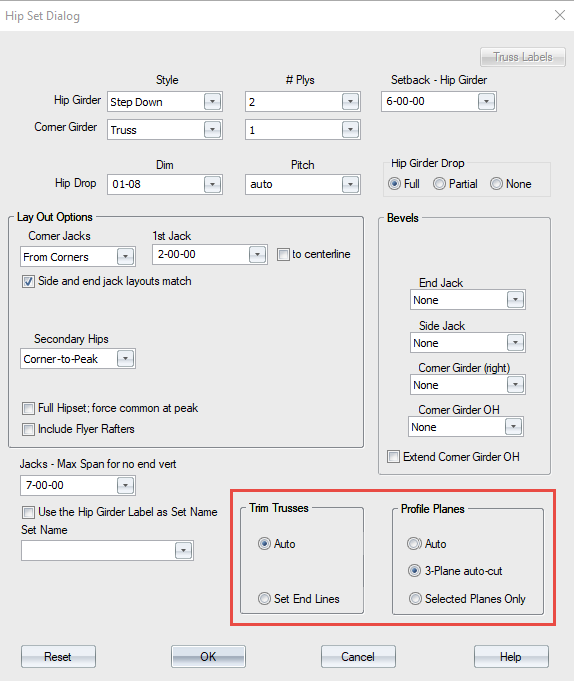
-
When Trim Trusses > Set End Lines is selected, you must manually select end lines for the truss. See the procedures outlined below.
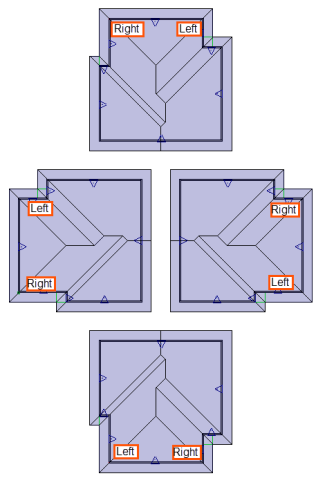
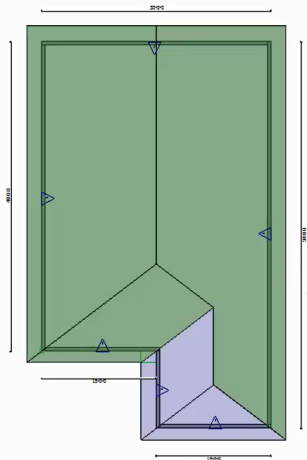
An example of advanced hip functionality is shown below.
The left side of the hip is determined by imagining that you are standing outside the building looking at the end wall. The left side of the hip is located on your left side.
4. Select the line(s) for the bottom chord on the left side of the hip area. Right-click to complete the action.
A dashed red line displays at the selected location.
5. Select the line(s) for the top chord on the left side of the hip area. Right-click to complete the action.
6. Select the line(s) for the bottom chord on the front of the hip area. Right-click to complete the action.
 Note: Layout reference lines are available to use throughout this procedure.

7. Select additional front side bottom chord boundaries.
8. Click Parallel  to define the setback.
9. Click the source line to set the reference line.
The Enter Offset Distance window displays.
10. Enter the offset distance and click OK. For this example, 6' is the offset distance.
11. Click the side to offset.
12. Right-click to complete the action.
13. Repeat these steps as needed for other parts of the hipset.
14. When you have defined all parts of the hipset, select the planes and right-click to complete the action.
15. Select bottom chord planes and right-click to complete the action.
These planes do not need to be selected in a specific order. Ceiling planes do not have to be selected if none exist in the hip area. Simply right-click to continue.
16. Select the corner for the left side and right-click to complete the action.
In situations where a corner line does not exist on this side, for example, in a mono situation, right-click to continue.
18. Specify a stop point for truss entry.
You can click or drag a line to indicate a stop point.
The additional truss behind the hip set is created.
You remain in truss input mode after trusses are added to the layout and can continue adding trusses, until you manually exit the command. Press Esc or right-click and select Cancel to exit.
Additional Placement Options
- If you already know the settings defined on the Hip Set dialog, you do not need to open the dialog to place trusses. Press Shift and click the icon for the truss placement option you want to use. Truss Studio automatically opens the layout in truss input mode, bypassing the dialog box.
- If you want to repeat the last truss placement, click
 or select Truss Placement > Next Truss > Repeat Last Placement.
Undo Options
- While the command is enabled, using Undo reverses the previous step.
- Using Undo during a multi-step command undoes one step at a time.
- Undoing past the first step in a multi-step command exits the command and undoes the last block.
- Outside of a multi-step command, Undo will undo a block at a time.
- Esc or Cancel ends the command and undoes any partially completed blocks in the script.
Related Topics